November 19, 2013

Toy Story Costume: Jessie

For the second year in a row, we decided to dress up as a group for Halloween. Since Nate wanted to be Buzz Lightyear, that made it easy: I would be Jessie and Evan would be Woody.

 Here's how I made my Jessie costume:

The Cowgirl Shirt


After striking out at three different thrift stores, I buckled and bought a white button-down shirt at Old Navy for $24. I bought yellow felt, red acrylic yarn (yick! but cheap!), and red ribbon at the fabric store. Because my shirt opens, I had to make two separate pieces - slightly different from the "real Jessie." To make sure everything lined up properly, I created two pattern pieces using regular ole tissue paper.


Between the existing yolk and placket of the Old Navy shirt and all of the curved lines of my planned embellishments, I didn't even consider sewing this! I used a goodly amount of fabric glue on each piece, being careful to follow the directions on the bottle. The glue dried clear.

The Yarn Wig


This project was easier than I thought it would be. To begin, I did a little online research (check out the cute pigtail version they made over at Easy Peasy Lemon Squeezy). Then I gathered up red yarn, red felt, and my sewing machine and got started!

I had trouble with what I thought would be the easiest part: measuring out the yarn! I wanted my wig to be long enough for a decent side braid - and almost immediately it became tangled up in my hands as I unwound the skein. I solved the problem by using the legs of my dining room table instead. Rolling that much yarn back and forth and back and forth hurt my old back (and drove my dog bananas!) - but it worked like a champion! Win!


I used red felt as the base onto which the yarn would be sewn. To determine the length, I measured from my hairline to the nape of my neck. The 14in I needed was longer than my felt, so I had to sew two pieces together to get the desired size. I also cut my base about 2.5in wide. )You'll see some people online using really thin strips of felt for this, but that made me nervous. I don't want this falling apart while I Trick-or-Treat!) After cutting the ends, I laid the yarn out, found the center, and pinned the top felt to the bottom, sandwiching the yarn and creating the "part." I sewed the widest zig-zag stitch my machine produces down the center of the felt, slowly removing the top piece as I went along. I'll admit that the machine jammed up twice AND that it was a pain to fix. Otherwise, this was a straightforward part of the costume.


Chaps and Accessories

I cheated on the chaps, so I didn't even take pictures. I literally laid the fabric along each leg of an old pair of jeans and cut to match. Then I safety-pinned each "chap" to the jeans from the inside.

The cuffs, belt, yellow hair bow, and hat were all part of a Jessie Accessory Kit.


Pin It!

December 14, 2011

Handprint Christmas Tree Skirt

Last year, in the reader response section of Real Simple magazine, I read about a mom who painted her children’s handprints onto their Christmas tree skirt each year. Not only was it a creative way to display their growth, but eventually, all of the handprints started to look like big snowflakes scattered around the skirt. I LOVED the idea, and made a version of my own.
The skirt was made using Simplicity pattern 1234, version C. Because there will eventually be handprints all over it, I simply used solid red and green fabric.
I then painted each of my son’s hands with white fabric paint and pressed them onto the skirt side-by-side. I was afraid he’d wiggle around, so we cut out hand-shaped holes into wax paper as a barrier. This turned out to be overkill – but better safe than sorry! The year was written next to the handprints using fabric paint pen.
It looks a little barren right now with only the two tiny handprints on the entire skirt, but I’m excited to see how it will change as the years pass by and he grows and grows!
Pin It!

December 7, 2011

Footprint Christmas Cards

I did it again: I found something I loved on Pinterest (follow me!), pinned it, and then made one of my own! Yippy! 
This project was deliciously simple and turned out beautifully! I started by grabbing some white paper and acrylic paint. I painted the bottom of my son’s feet green and his little toes red; there were lots of accompanying giggles. I pressed each foot onto a separate piece of paper and then let it dry while I carted him off to the tub.
Once the pages were dry, I scanned them and then manipulated them into overlapping images that looked like a Christmas tree in Photoshop. I drew the trunk and star in Photoshop as well.  That’s all! I printed the cards on Avery Half-fold greeting cards, which I’ll admit were expensive ($13 for a pack of 20), but I think the end result was worth it.
Now I need to start planning for next year’s card. After this handmade gem, a store-bought card just won’t do!
Pin It!

December 5, 2011

Breezy Meadows Scarf


At long last, I have finished my Breezy Meadow’s scarf!

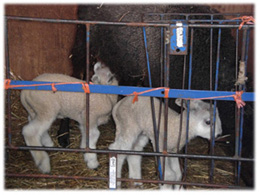
Last May I went on my first “Fiber Farm Crawl.” It was terrific! We toured 5 different farms, met the proprietors, and best of all … met all of the animals! Llamas, goats, sheep, rabbits, and last but not least … the adorable alpacas!

As a knitter, it was thrilling to go behind-the scenes of fiber production! It’s wild to pet an animal, watch it walking around, and then realize that eventually the fur you’re touching will be sheared, cleaned, carded, spun, and then knit into something like this scarf!

I purchased this yummy wool at our second stop that day, Breezy Meadows Farm. I love the natural color – and it’s so soft! The pattern is called Eton’s Scarf and is available for free on the Mellow Being blog. It’s simple – but the result is classic and adorable. My only complaint is that with 42 stitches across, it’s a tad time consuming. I kept getting bored with it and switching to other projects, so it took way longer to complete than it should’ve.

But – complete it is! I’m pleased with the end product. And – the width that I complained about while knitting will be W-A-R-M in the snowy winter!
Breezy Meadows Scarf


Close up of pattern


Llambs at Breezy Meadows


Hello, handsome!


Pin It!

November 30, 2011

Handmade Wrapping Paper

Inspiration struck at Lowes. You read correctly: Lowes. A few times a year, Lowes publishes a magazine of seasonal project ideas. This year, their holiday edition featured hand-painted wrapping paper that I fell in love with! Of course, they used materials from the store while I raided my local craft center – but the end result was the same.
For supplies, I used basic brown craft paper, acrylic paint (in red, green, white, and black), and sponge brushes.  I used circular-shaped brushes for the smaller dots and hand-drew the circles using standard brushes for the larger dots. The free-handed circles aren’t perfect, nor are they all the same size – but I like the hand-made feel.
To keep the rustic-looking motif, I used regular twine in lieu of ribbon. I must admit, the really cleverly wrapped gifts in the photographs were the creations of my husband. The man is a gift-wrapping artist!
Pin It!

November 24, 2011

Kids' Table Fashion

We’re headed to Nebraska for Thanksgiving!
To really get into the spirit, I used the last of my freecycled fabric to make Nate and his cousins matching turkey tee shirts. I used the same, patterned fabric to stitch their names on the back. They were a big hit on Thanksgiving day! In fact, as I watched cousins pouring into the house (there were over 15 kids in the “great grandchildren picture), I found myself wishing I’d made shirts with names for ALL of the children!

Pin It!

November 21, 2011

Monogrammed Baby Onesies

What do you give to the mom who has everything?
Well. Not technically. But, in this case, I needed to give a unique baby gift to a friend who already has twin toddlers. That means she already owns the requisite baby equipment … times two! And I didn’t want to knit something. First, I’m a S.L.O.W. knitter, so odds of the “baby” having a driver’s license by the time I finished the garment are high. And second, this particular mom is the Domestic Knitter. So, I felt like it would be akin to giving cupcakes to your friend the baker.
So I came up with this: monogrammed, hand-dyed onesies.  Dana over at Made had dyed onesies  and I totally loved the idea! It makes them so unique! Out came the Rit dye!
Next, I made five different freezer paper stencils of the letter S (for baby Sebastian).
Now he has onesies in fun colors with his initial on them – so no mistaking them as big brother’s hand-me-downs!


Pin It!